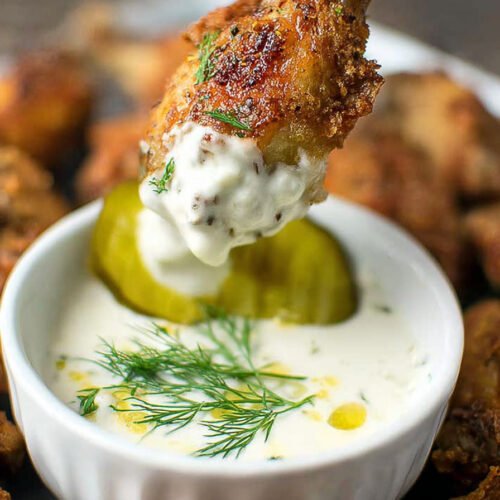
1) The Crispy Skin Secret Behind Dill Pickle Chicken Wings
Soggy wings with sharp pickle flavor but zero crunch can ruin the whole tray. I’m Lila, and my first batch tasted tangy but baked up soft because I rushed the drying step. After testing the brine time, rack position, and coating, I discovered that dill pickle chicken wings need both a proper pickle soak and a dry, baking-powder-dusted surface. That little adjustment made the wings feel like the kind of game-day food I actually get excited to serve: juicy inside, crisp outside, and bold enough to make pickle brine chicken wings worth saving.
Table of Contents
- 1) The Crispy Skin Secret Behind Dill Pickle Chicken Wings
- 2) Key Takeaways
- 3) Easy Dill Pickle Chicken Wings Recipe
- 4) Why Most Dill Pickle Chicken Wings Recipes Fail
- 5) Ingredients for Dill Pickle Chicken Wings
- 6) How to Make Dill Pickle Chicken Wings
- 7) Recipe Card: Dill Pickle Chicken Wings
- 8) Tips for Making Dill Pickle Chicken Wings
- 9) Common Mistakes & Fixes
- 10) How to Tell Dill Pickle Chicken Wings Are Perfect
- 11) Professional Secrets Behind Better Dill Pickle Chicken Wings
- 12) Best Dishes or Pairings to Serve With Dill Pickle Chicken Wings
- 13) Making Dill Pickle Chicken Wings Ahead of Time
- 14) Storing Leftover Dill Pickle Chicken Wings
- 15) FAQ (Real Cooking Questions)
- 16) Save This Dill Pickle Chicken Wings Recipe
- 17) Conclusion
- 18) Nutrition
2) Key Takeaways
- Pickle brine seasons deeply: The wings need enough time in dill pickle juice to pick up tangy flavor, but not so long that the meat becomes overly firm.
- Dry skin is non-negotiable: Rinsing and patting the wings completely dry helps the baking powder coating cling instead of turning pasty.
- Baking powder is the crisping tool: Aluminum-free baking powder helps the surface dry and brown; baking soda should not be used because it can taste harsh.
- Two oven temperatures create better texture: A low bake renders fat under the skin, then high heat finishes the wings with golden, crisp edges.
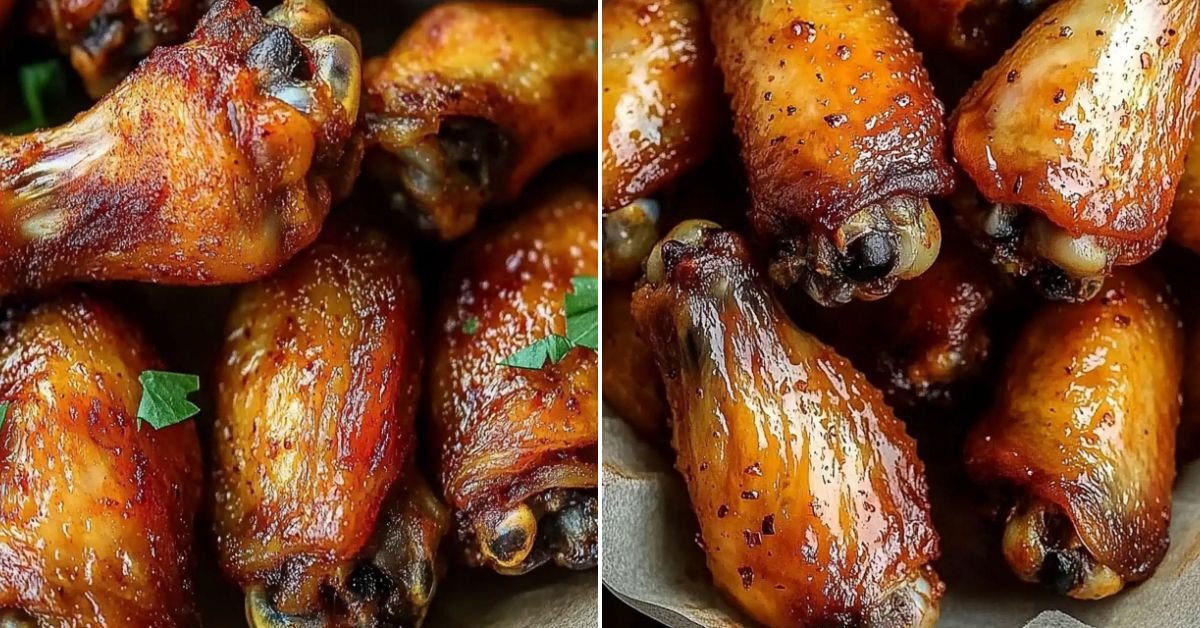
3) Easy Dill Pickle Chicken Wings Recipe
Dill pickle chicken wings work because the pickle brine does two jobs before the wings ever reach the oven: it seasons the meat and adds acidity that makes every bite taste brighter. The challenge is that brined wings can hold extra surface moisture, and moisture is the enemy of crisp skin. That is why this method rinses the wings after marinating, dries them thoroughly, coats them with a measured baking powder and spice mixture, then bakes them on a rack.
The wire rack is not just for convenience. It lifts the wings above the pan so heat can circulate around the skin instead of trapping steam underneath. Starting low at 250°F gives the fat under the skin time to render. Finishing at 425°F pushes the outside toward that golden, crackly texture people want from crispy dill chicken wings. The flavor stays tangy and savory, but the texture does not feel wet, rubbery, or greasy.
4) Why Most Dill Pickle Chicken Wings Recipes Fail
Most dill pickle chicken wings fail because the brine is treated like the whole recipe instead of the first step. Pickle juice gives flavor, but it also leaves the surface wet. If the wings go straight from brine to seasoning without a proper rinse and dry, the coating becomes damp and the oven has to fight through moisture before it can crisp the skin.
Another common problem is using baking soda instead of baking powder. Baking soda can create an unpleasant alkaline flavor that fights the pickle tang. Aluminum-free baking powder is the right choice here because it helps dry the skin without adding a metallic taste. The coating should be thin and even, not clumpy or pasty.
Crowding the pan is also a real texture killer. When wings touch each other, they trap steam. That steam softens the skin and prevents browning. A single layer on a sprayed rack gives each piece space to crisp. If your oven runs unevenly, rotating the pan during the high-heat stage helps prevent pale spots and overly dark edges.
The last failure is rushing the temperature change. The low oven stage slowly renders fat under the skin. Skipping it can leave the outside browned while the skin still feels chewy. The high oven stage then finishes the job, creating oven baked pickle wings that taste tangy, juicy, and crisp instead of wet or rubbery.
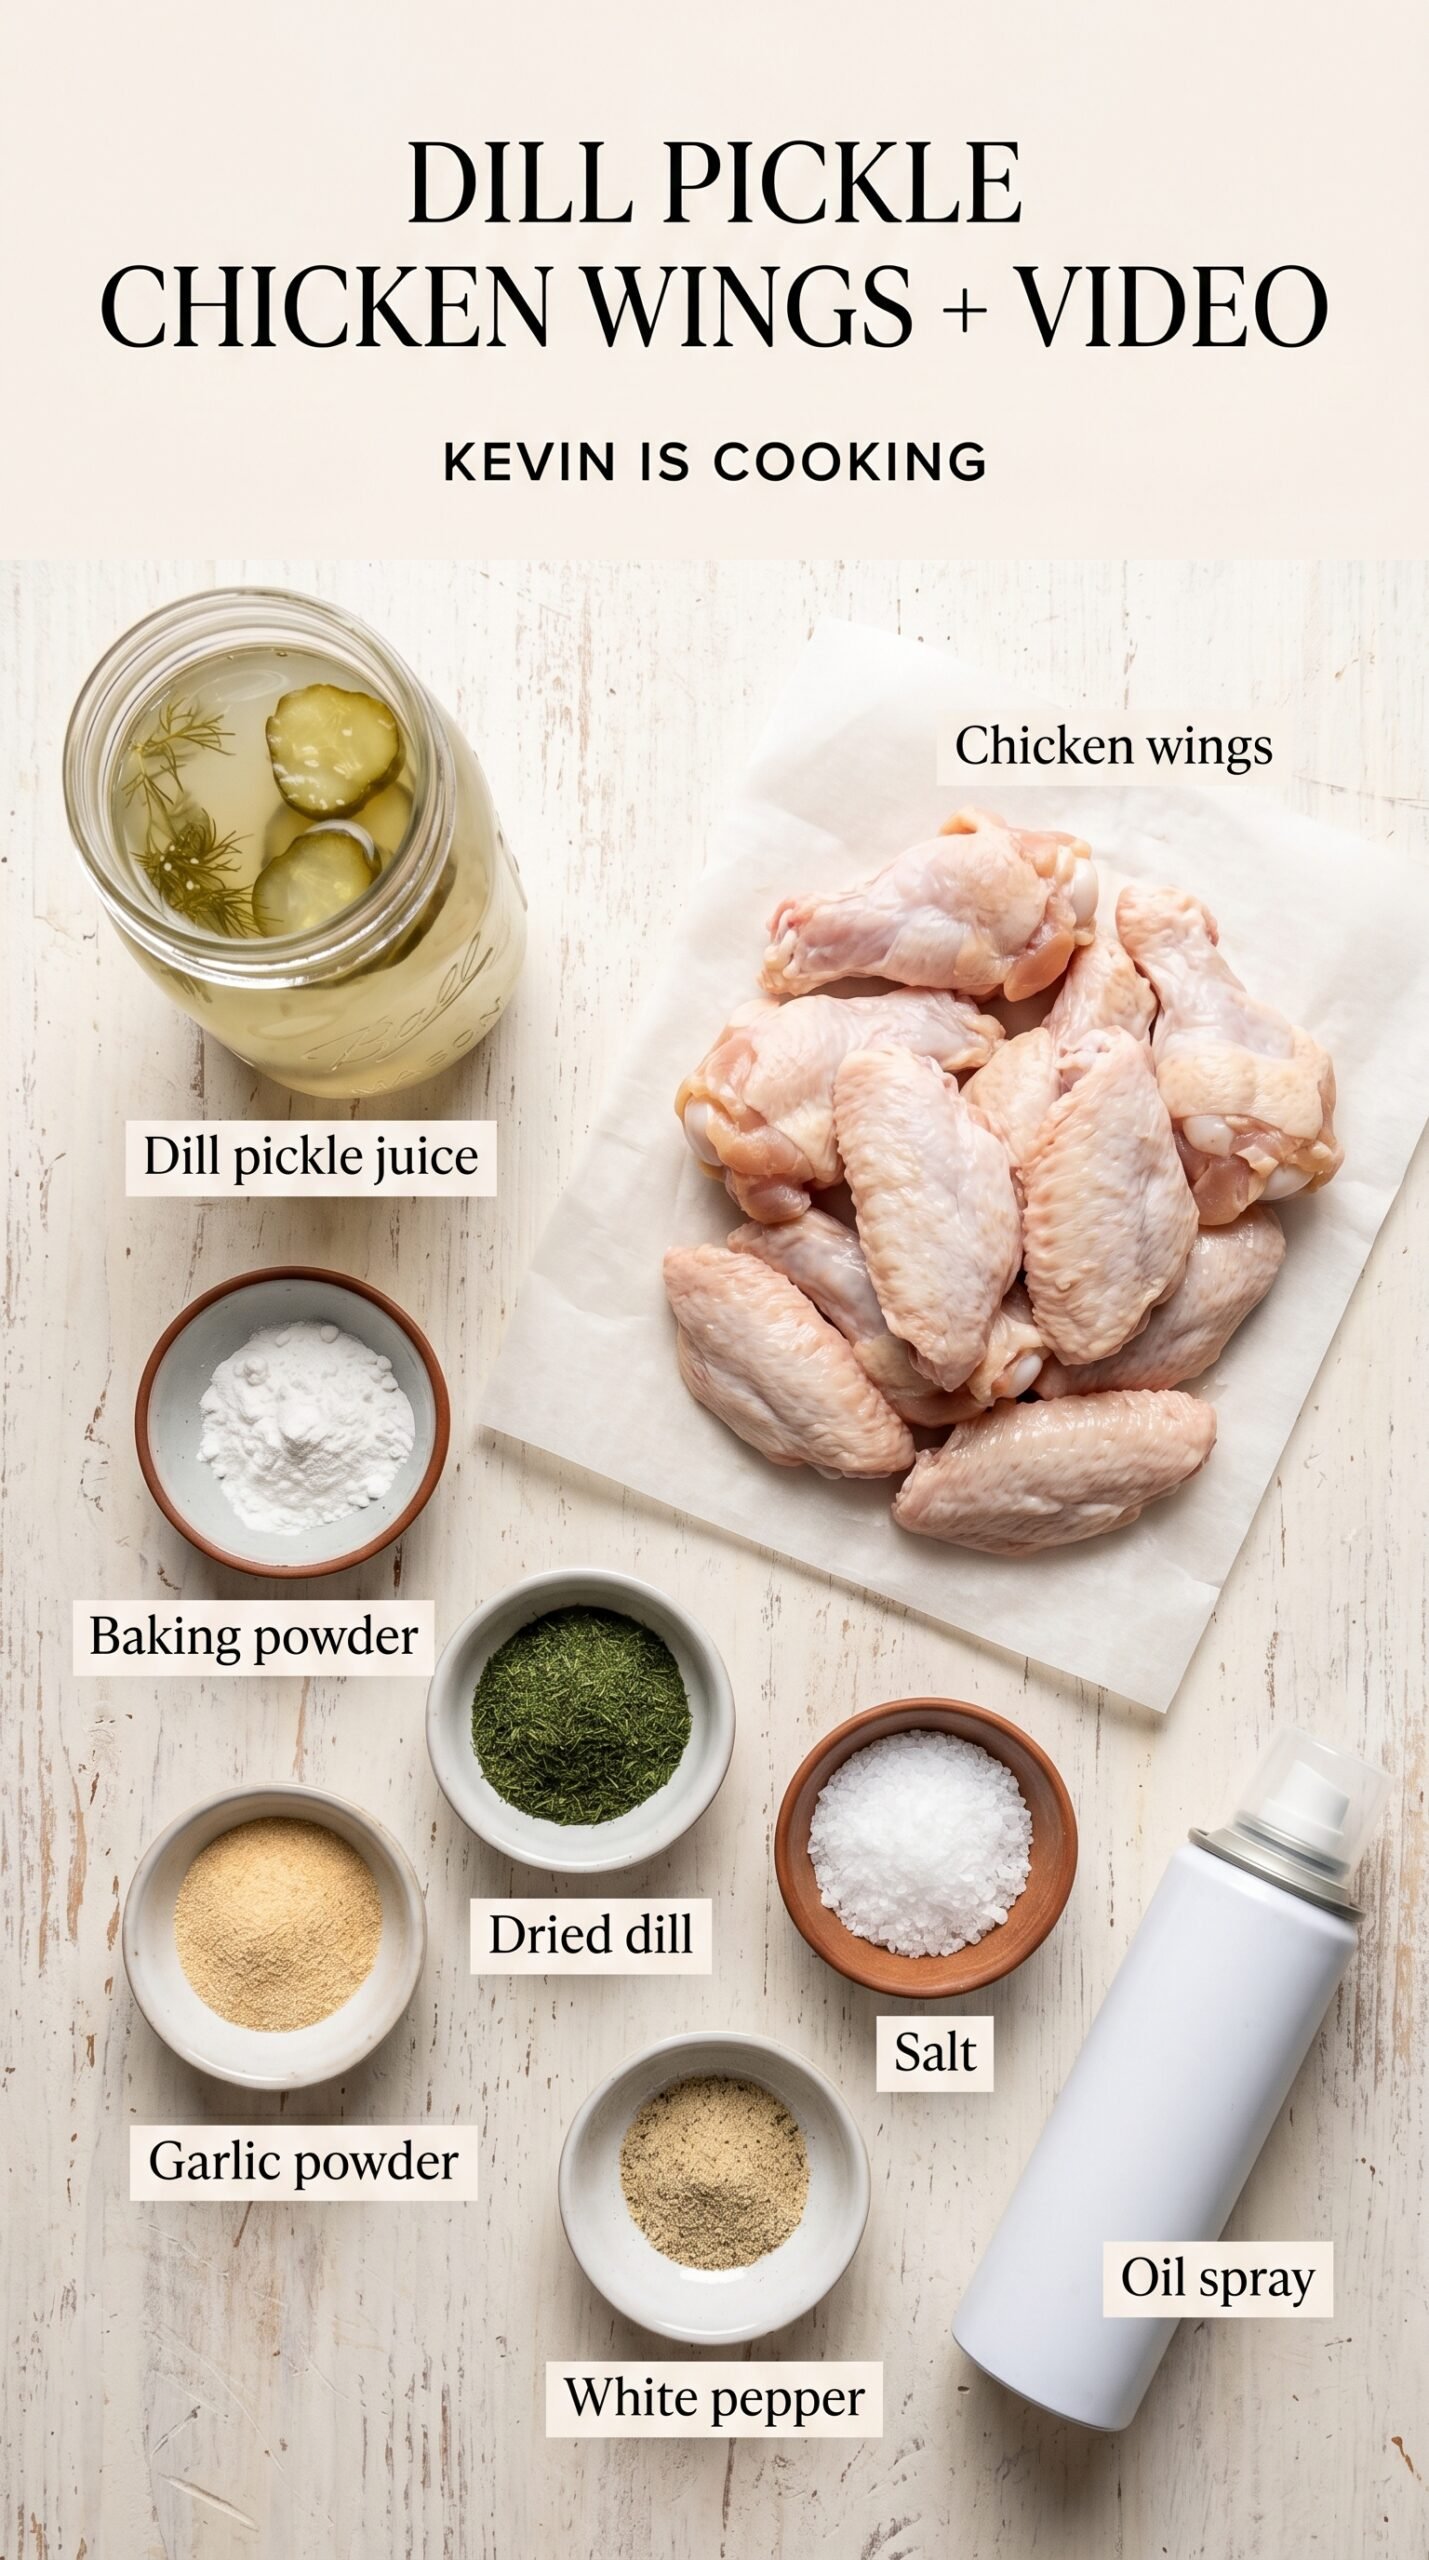
5) Ingredients for Dill Pickle Chicken Wings
Chicken wings: Use 4 pounds of wings, either whole or split into flats and drumettes. Wings work especially well here because the skin can crisp while the meat stays juicy. If the pieces are different sizes, keep an eye on the smaller flats during the final bake so they do not overbrown.
Dill pickle juice or brine: The pickle brine seasons the chicken and gives the wings their signature tang. Use brine from a jar with a flavor you already like, because that taste will carry into the meat. A very salty brine can make the wings taste stronger, so the added salt in the seasoning stays controlled.
Aluminum-free baking powder: This is the crisping ingredient, not a flavoring shortcut. It helps dry the skin so it browns better in the oven. Do not substitute baking soda. Baking soda can leave a soapy or bitter taste, especially with acidic pickle juice wings.
Dried dill: Dried dill reinforces the pickle flavor without adding wet herbs to the skin. Rub it lightly between your fingers before mixing if it smells muted. Fresh dill is better saved for serving with ranch or a dip because fresh herbs can burn during the high-heat bake.
Garlic powder: Garlic powder gives the wings savory depth while keeping the skin dry. Fresh garlic would add moisture and could scorch at 425°F, so powder is the better choice for the coating.
Salt: Salt sharpens the chicken flavor, but the recipe does not need a heavy hand because pickle brine already contains salt. The measured amount keeps the wings seasoned without making them taste overly salty.
White pepper: White pepper is optional, but it adds a gentle background heat without black specks on the wings. If you prefer a more familiar pepper flavor, you can skip it and rely on the garlic and dill.
PAM or oil spray: Spraying the rack keeps the wings from sticking as the skin crisps. This matters because tearing the skin when you lift the wings can ruin the best crispy patches.
- Pickle brine vs plain salt brine: Pickle brine adds acidity, dill flavor, and salt at the same time; plain salt brine seasons but does not give the same tang.
- Baking powder vs baking soda: Baking powder helps crisp the skin gently, while baking soda can taste harsh and should not be used here.
- Wire rack vs bare sheet pan: A rack allows airflow under the wings; a bare pan traps moisture and can make the bottom side soft.
- Low heat then high heat vs one hot bake: The two-stage method renders fat first, then crisps the skin more evenly.
6) How to Make Dill Pickle Chicken Wings
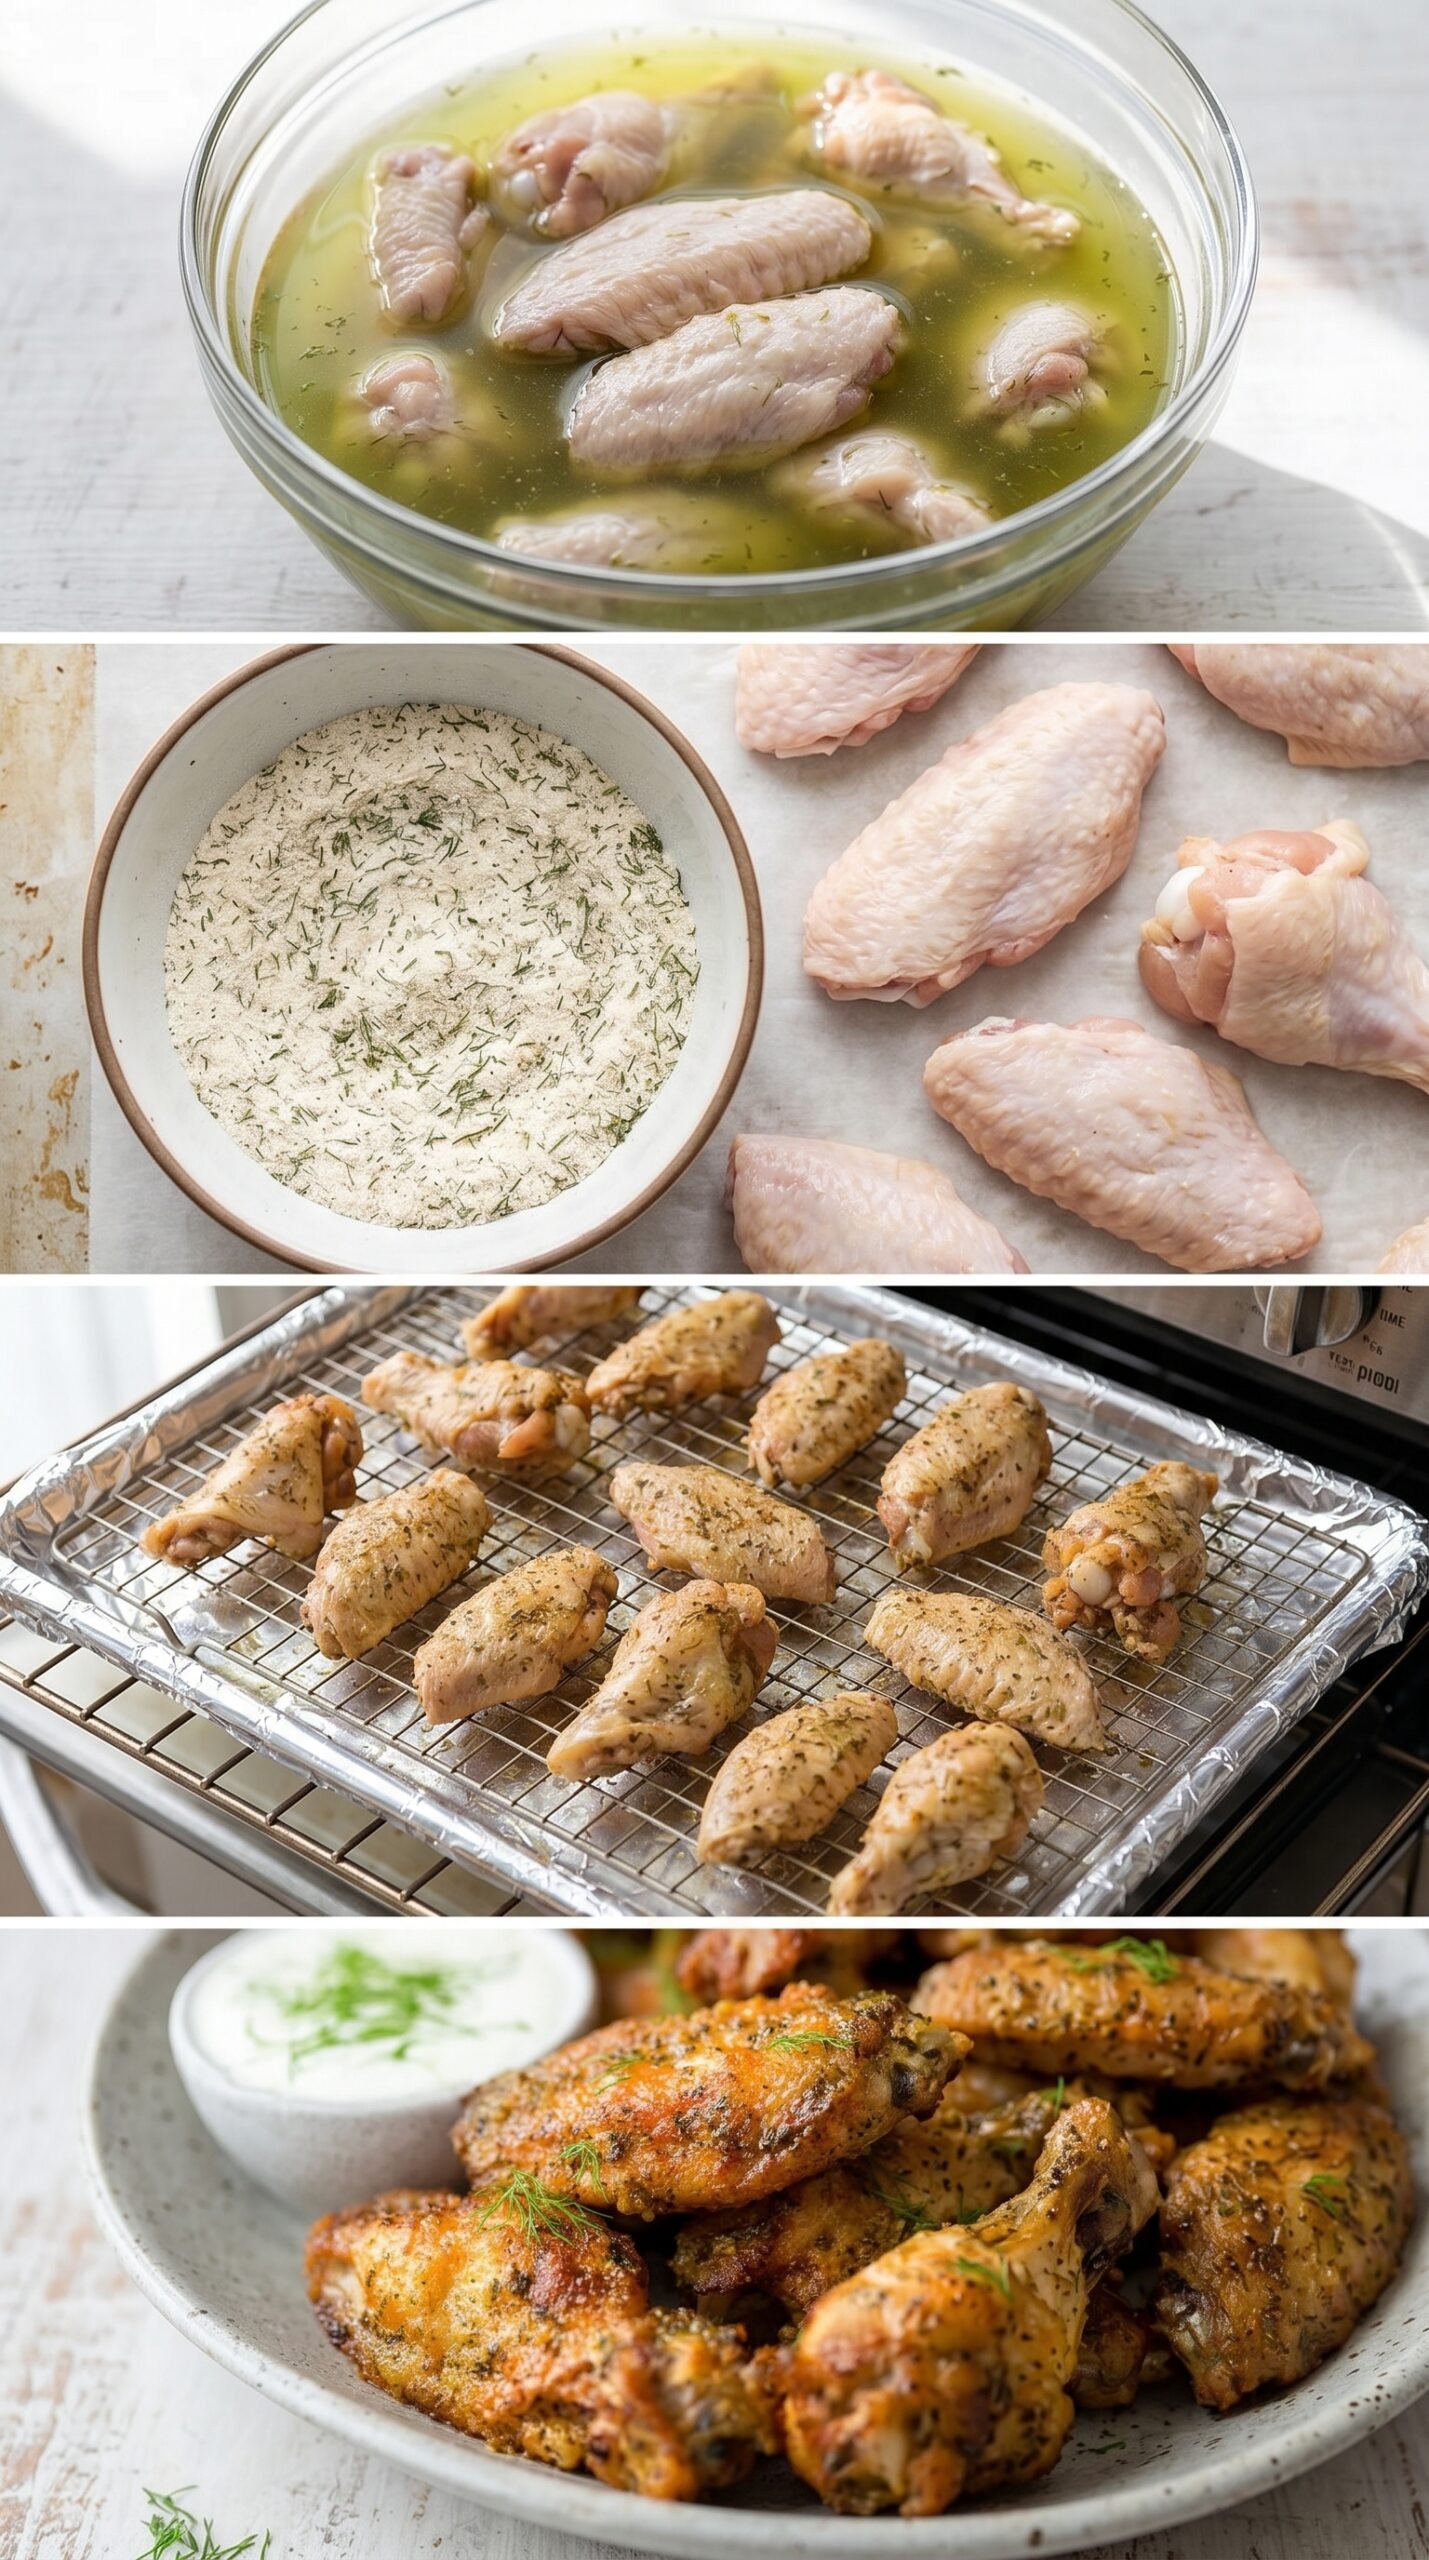
Step 1: Place the wings in a shallow dish or resealable bag and pour the dill pickle brine over them. Press the wings down so they are mostly submerged, then refrigerate for 1 to 4 hours. The longer end of the range gives stronger pickle flavor, but the wings should not be left indefinitely because very acidic, salty brines can change the meat texture.
Step 2: Remove the wings from the brine, rinse them, and pat them dry. This is the step that separates crisp wings from soft ones. The skin should not look shiny or wet when you move on to seasoning.
Step 3: Heat the oven to 250°F with racks in the upper and lower positions. Line a rimmed baking sheet with foil, then set a sprayed wire rack on top. The foil catches drips, while the rack helps air move around the wings.
Step 4: Whisk the aluminum-free baking powder with dried dill, garlic powder, salt, and white pepper. Toss the dry wings with this mixture in a large bowl or zipper-lock bag until every piece has a light, even coating. If you see thick white patches, keep tossing so the coating distributes better.
Step 5: Arrange the wings skin side up in a single layer on the rack. Bake on the lower rack at 250°F for 30 minutes to render fat under the skin. Move the pan to the upper rack, raise the oven to 425°F, and bake for 40 to 45 minutes, rotating if needed, until the wings are golden, crisp, and cooked through. Rest for 5 minutes before serving so the juices settle and the skin stays pleasantly crisp.
7) Recipe Card: Dill Pickle Chicken Wings
Dill Pickle Chicken Wings With Crispy Oven-Baked Skin
Ingredients
- 4 lbs chicken wings, split into flats and drumettes if needed and patted very dry before seasoning
- 4 cups dill pickle juice/brine from an empty pickle jar, enough to mostly submerge the wings
- 5 tsp baking powder, aluminum-free and not baking soda, to help dry and crisp the skin
- 2 tsp dried dill, rubbed lightly between your fingers to wake up the aroma
- 1 tsp garlic powder, for savory depth without adding surface moisture
- 3/4 tsp salt, adjusted lightly because pickle brine already seasons the chicken
- 1/8 tsp white pepper, optional, for gentle heat without dark specks
- PAM/Oil spray, for coating the wire rack so the wings release cleanly
Instructions
Marinate
- Place the chicken wings in a shallow dish or resealable plastic bag. Pour the dill pickle juice over the wings, pressing them down so as many pieces as possible are submerged. Cover and refrigerate for 1 to 4 hours; the longer time gives deeper pickle flavor without changing the cooking method.
- Remove the wings from the refrigerator, rinse off the excess brine, and pat them thoroughly dry. Do not skip the drying step, because surface moisture is the biggest reason pickle chicken wings turn soft instead of crisp.
Prep
- Heat the oven to 250°F with racks set in the upper and lower positions. Line a rimmed baking sheet with aluminum foil to catch drips and make cleanup easier.
- In a small bowl, whisk together the aluminum-free baking powder, dried dill, garlic powder, salt, and white pepper until evenly combined with no clumps of baking powder.
- Use paper towels to remove any remaining moisture from the chicken wings, patting all over the skin, edges, and joints. The skin should feel tacky-dry, not wet.
- Place the wings in a large bowl or zipper-lock plastic bag. Add the baking powder and spice mixture, then stir or seal and shake until every wing has a thin, even coating.
Bake
- Spray a wire rack with PAM or oil spray and set it over the prepared baking sheet. Arrange the wings in a single layer, skin side up, leaving space between pieces so hot air can circulate.
- Bake the wings on the lower rack for 30 minutes at 250°F. This gentle stage slowly renders fat under the skin, which helps the final high-heat bake create a crispier surface.
- Move the wings to the upper rack, increase the oven temperature to 425°F, and bake for 40 to 45 minutes. Rotate the sheet pan if needed, and bake until the skin is golden brown, crisp, and the chicken reaches 165°F internally.
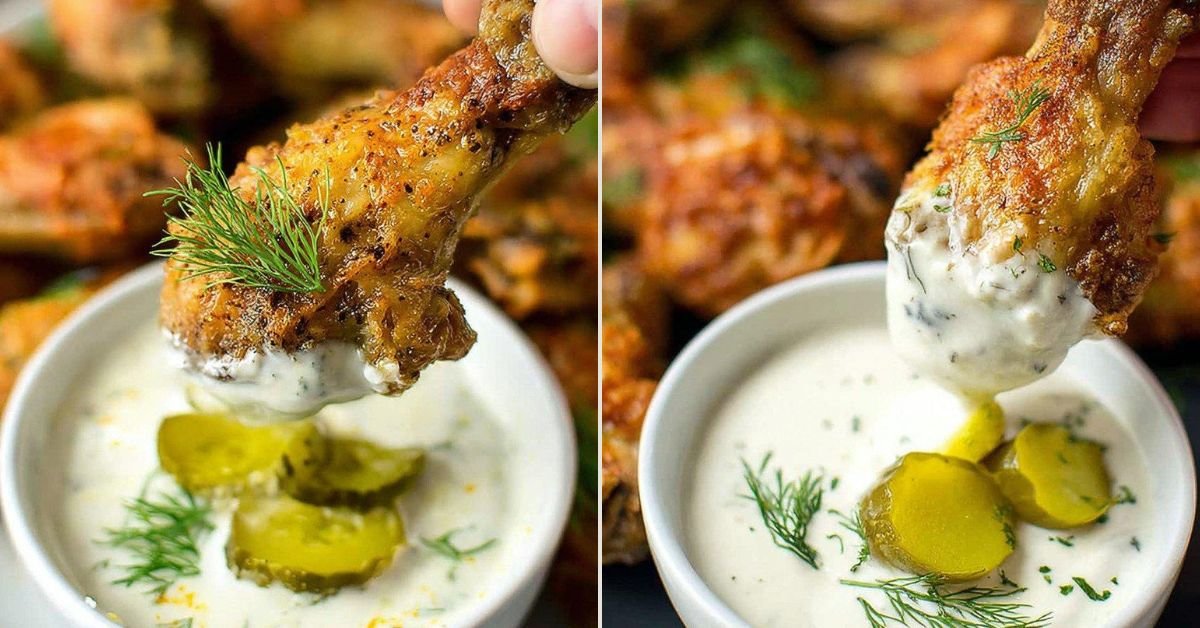
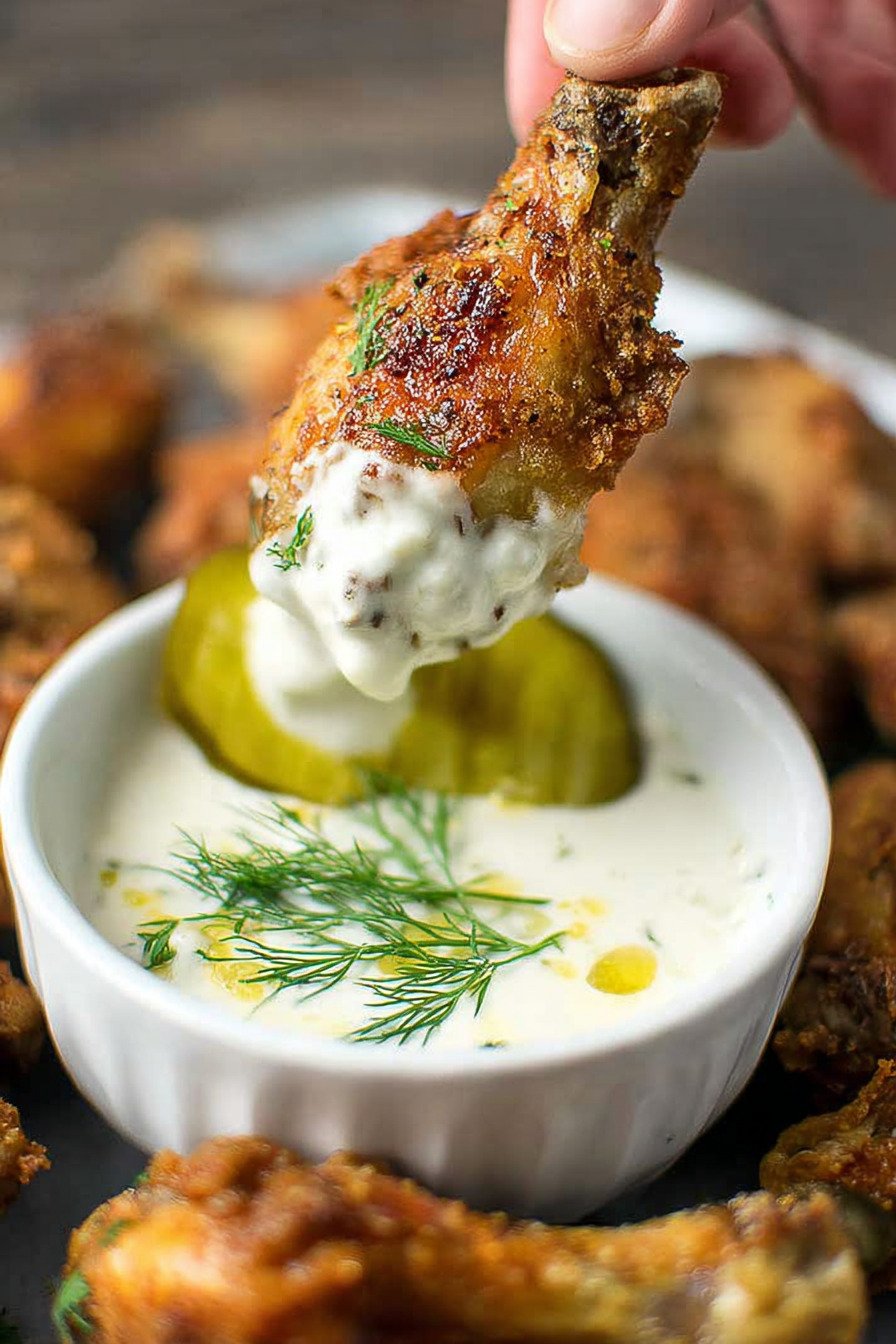
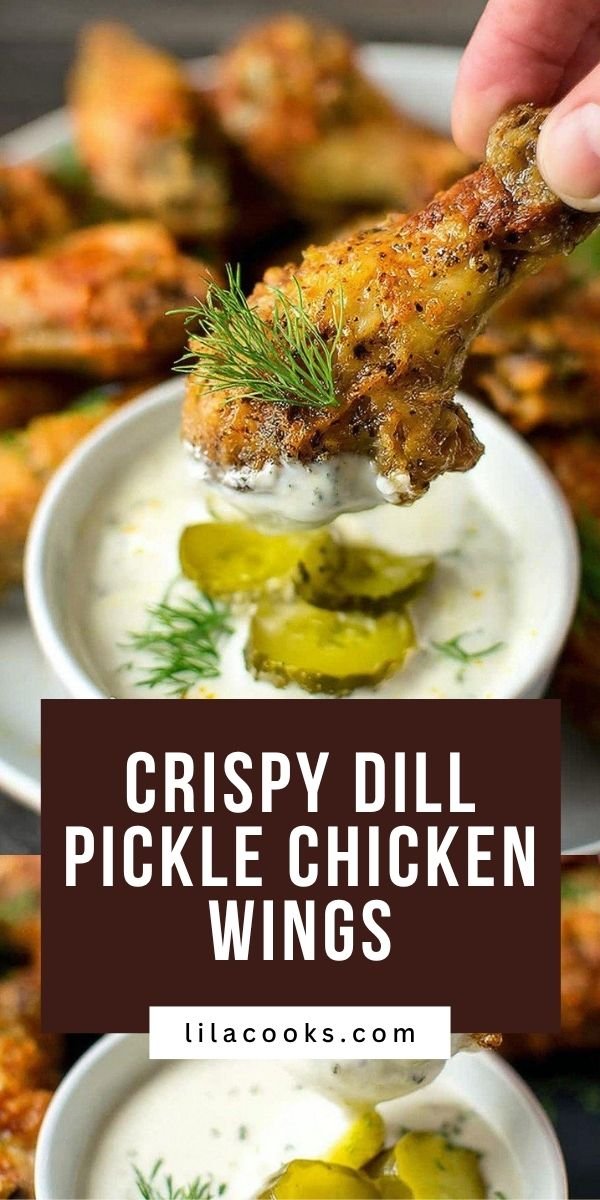
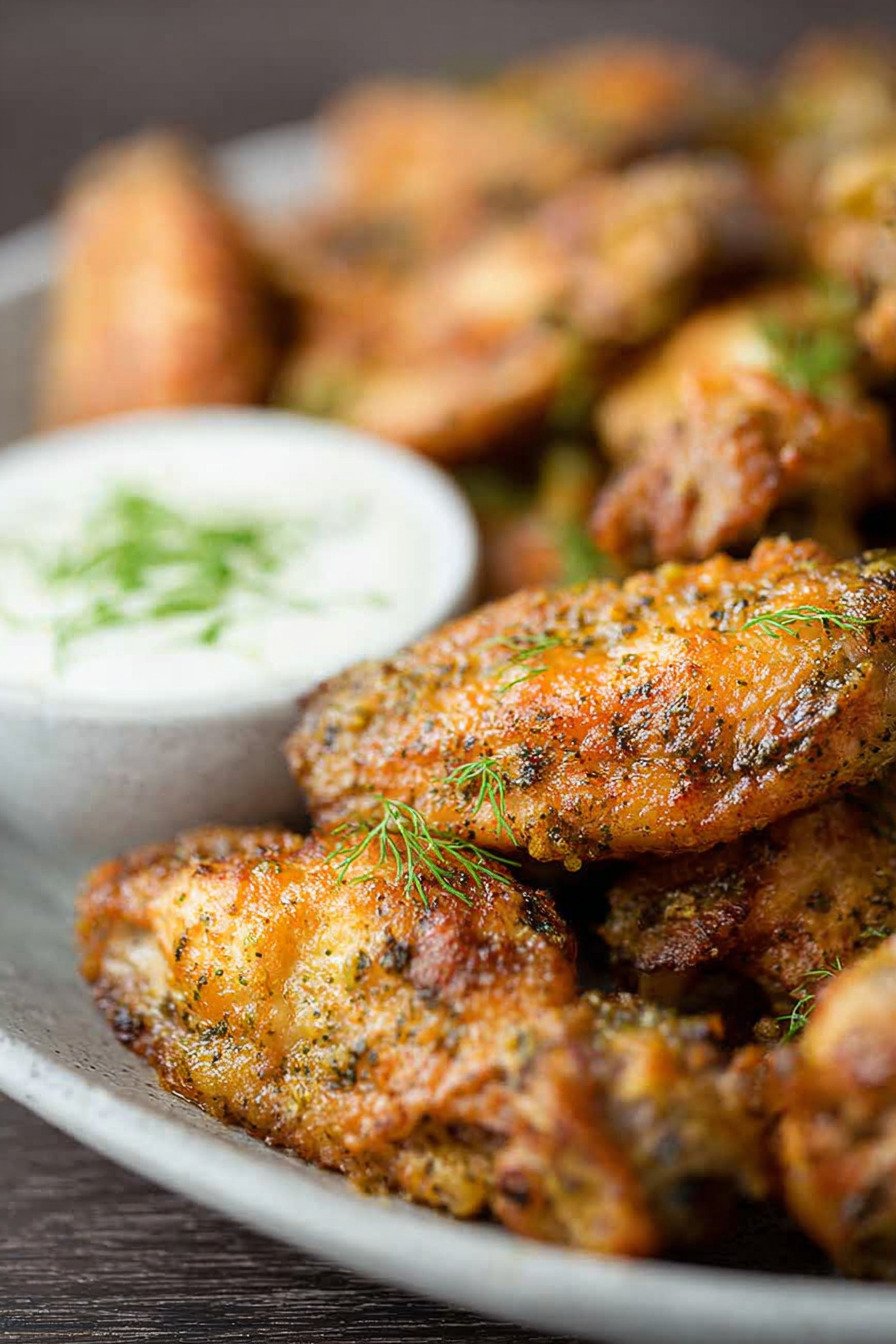
- Remove the wings from the oven and let them rest for 5 minutes before serving. Serve with your sauce of choice; ranch dressing mixed with chopped dill and diced dill pickle keeps the flavor sharp and creamy.
8) Tips for Making Dill Pickle Chicken Wings
The biggest tip is to respect the dry surface. Pickle chicken wings already carry moisture from the brine, so the paper towel step should feel almost excessive. Pat the tops, bottoms, edges, and joints. If you are working with a large batch, change paper towels once they become too damp to absorb more moisture.
Use a large enough bowl or bag for coating. When the wings are packed too tightly, the baking powder mixture lands in clumps instead of a fine layer. A thin coating crisps; a thick coating can taste powdery. If using a bag, seal it with some air inside and shake gently so the wings tumble instead of compacting.
Do not skip the lower rack stage. That slower bake is what helps the fat under the skin loosen before the high heat hits. When the wings move to the upper rack, the hotter air finishes browning the surface. This is especially useful for oven baked pickle wings because oven heat is drier than frying but needs time and airflow to do its best work.
Serve sauces on the side rather than tossing the wings immediately if crisp skin is your priority. Ranch with chopped dill and diced pickle works beautifully because it echoes the brine without hiding the roasted wing flavor. If you toss the wings in sauce, do it right before serving.

9) Common Mistakes & Fixes
Problem: The wings taste good but the skin is soft. Cause: The surface was too wet after brining, or the wings were crowded on the rack. Fix: Rinse, pat dry thoroughly, and leave space between every piece so moisture can escape.
Problem: The wings have a bitter or soapy taste. Cause: Baking soda was used instead of aluminum-free baking powder. Fix: Use baking powder only, measure it carefully, and toss until the coating is thin and even.
Problem: The wings brown unevenly. Cause: Oven hot spots or a pan that was not rotated during the high-heat stage. Fix: Rotate the sheet pan as needed once the wings are on the upper rack at 425°F.
Problem: The pickle flavor is too mild. Cause: The wings did not marinate long enough or were not fully exposed to the brine. Fix: Aim closer to 4 hours next time and turn the wings once during marinating if they are not completely submerged.
Problem: The skin sticks to the rack. Cause: The rack was not sprayed well enough before baking. Fix: Coat the wire rack with PAM or oil spray before arranging the wings, especially where the skin will touch the metal.
10) How to Tell Dill Pickle Chicken Wings Are Perfect
Dill pickle chicken wings are ready when the skin looks golden brown with slightly darker edges around the tips and joints. The surface should look dry and crisp, not pale, shiny, or wet. When you lift a wing from the rack, the skin should stay attached instead of tearing away in soft patches.
The texture should be juicy inside with a crisp outer layer. The wings should not feel rubbery when bitten, and the skin should not pull away in a chewy sheet. If you tap a wing lightly with tongs, the outside should feel firm rather than damp.
The aroma should be savory, roasted, and gently dill-forward. The pickle flavor should taste bright but balanced, not aggressively sour or overwhelmingly salty. If the wings taste flat, they may have needed more time in the brine. If they taste too sharp, serve them with a creamy dip to round out the acidity.
For doneness, the chicken should reach 165°F internally. Check the thickest part of a drumette without touching bone. Resting for 5 minutes helps the juices settle and keeps the final bite from feeling dry.
11) Professional Secrets Behind Better Dill Pickle Chicken Wings
The professional trick behind crispy dill chicken wings is controlling moisture at every stage. Brining adds flavor, but drying creates crispness. A good wing recipe balances both. That means the marinade is not the final texture step; it is the flavor step. The drying, coating, rack setup, and oven temperature finish the job.
Another useful detail is skin-side-up placement. The skin needs direct exposure to dry heat, so arranging the wings with the skin facing upward gives the surface the best chance to crisp. The rack keeps rendered fat from pooling around the wings, which prevents greasy bottoms.
The baking powder mixture should act like a dry dusting, not a breading. If it looks like a thick paste, the wings were probably still wet. When done correctly, the coating almost disappears during baking, leaving behind browned skin with pickle, dill, and garlic flavor.
12) Best Dishes or Pairings to Serve With Dill Pickle Chicken Wings
Dill pickle chicken wings pair best with sides that either cool the tang or add crunch. Ranch dressing with chopped dill and diced pickle is a natural match because it turns the pickle flavor into something creamy and snackable. Blue cheese dip also works if you want a sharper, saltier contrast.
For a game-day plate, serve the wings with celery sticks, carrot sticks, potato wedges, or a crisp slaw. The fresh vegetables help balance the richness of the chicken skin, while potatoes make the meal feel more filling. For a casual dinner, add a simple green salad or roasted vegetables so the plate does not feel too heavy.
If you like heat, serve hot sauce on the side rather than baking it onto the wings. The pickle flavor is already bright, so a small amount of heat can lift the wings without covering the dill and garlic.

13) Making Dill Pickle Chicken Wings Ahead of Time
The best make-ahead strategy is to marinate the wings earlier in the day, then rinse, dry, coat, and bake closer to serving time. The brine stage can happen 1 to 4 hours ahead, which makes the recipe easier to manage without sacrificing texture. Avoid coating the wings too early after drying because the baking powder mixture can absorb moisture while it sits.
If you need to serve them for a party, bake them shortly before guests arrive and hold them uncovered in a warm oven for a short time. Covering hot wings traps steam, and steam softens crisp skin. Sauce should stay on the side until serving so the texture holds longer.
For a dill pickle chicken wings air fryer variation after baking or for reheating, use the air fryer-style heat only to refresh crispness. The main recipe method stays oven baked, but hot circulating air can help revive leftovers more effectively than a microwave.
14) Storing Leftover Dill Pickle Chicken Wings
Store leftover dill pickle chicken wings in an airtight container in the refrigerator for up to 3 days. Let them cool before closing the container so condensation does not build up too much. The skin will soften in the refrigerator, which is normal for cooked wings.
To reheat, place the wings on a rack or in a hot air fryer-style basket until heated through and the surface feels crisp again. A microwave will warm the meat, but it will make the skin rubbery. If you care about texture, dry heat is the better reheating choice.
Freezing is possible, but it is not ideal for the crispiest texture. If you freeze leftovers, thaw them in the refrigerator and reheat with dry heat. Serve with a fresh dip or chopped pickles to bring back the bright flavor after storage.
15) FAQ (Real Cooking Questions)
Can I marinate the wings longer than 4 hours? I do not recommend going far beyond 4 hours for this method. Pickle brine is salty and acidic, and very long marinating can make the chicken texture too firm. For stronger flavor, turn the wings during the 4-hour window instead of extending the soak too much.
Do I really need to rinse the wings after brining? Yes. Rinsing removes excess surface salt and brine, then drying gives the skin a better chance to crisp. The flavor still remains in the meat, but the outside is cleaner and easier to coat evenly.
Why can’t I use baking soda? Baking soda is much stronger and can leave a bitter, soapy flavor. Aluminum-free baking powder is the correct ingredient because it supports browning and crisping without fighting the dill pickle flavor.
Can I make these as pickle juice wings with leftover jar brine? Yes, leftover pickle jar brine is exactly the kind of ingredient that works here. Use a brine you enjoy, because sweet, spicy, garlicky, or extra-sour pickle juice will all influence the finished wings.
How do I keep the wings crispy for serving? Keep them on a rack, avoid covering them tightly, and serve sauce on the side. If they sit too long, refresh them briefly with dry heat before serving. The goal is to avoid trapped steam.
16) Save This Dill Pickle Chicken Wings Recipe
If this dill pickle chicken wings recipe helped you solve the soggy-wing problem, save it for game day, casual dinners, or the next time you have pickle brine waiting in the jar. The key reminder is: brine for flavor, dry for crispness, and bake on a rack for better texture.
17) Conclusion
Dill pickle chicken wings are not difficult, but they do ask for attention in the right places. The brine brings the tang, the drying step protects the skin, the baking powder coating supports crispness, and the two-temperature oven method builds the final texture. Once you understand that sequence, the recipe stops feeling like a gamble.
The real transformation is going from wings that taste good but feel soft to wings that deliver pickle flavor and a crisp bite at the same time. That is the small kitchen win that makes this method worth repeating: bright flavor, juicy meat, golden skin, and enough practical control to make the next batch even better.
18) Nutrition
Serving Size 1 portion Calories 430 Sugar 0 g Sodium 980 mg Fat 29 g Saturated Fat 8 g Carbohydrates 3 g Fiber 0 g Protein 37 g Cholesterol 155 mg


Leave a Comment