
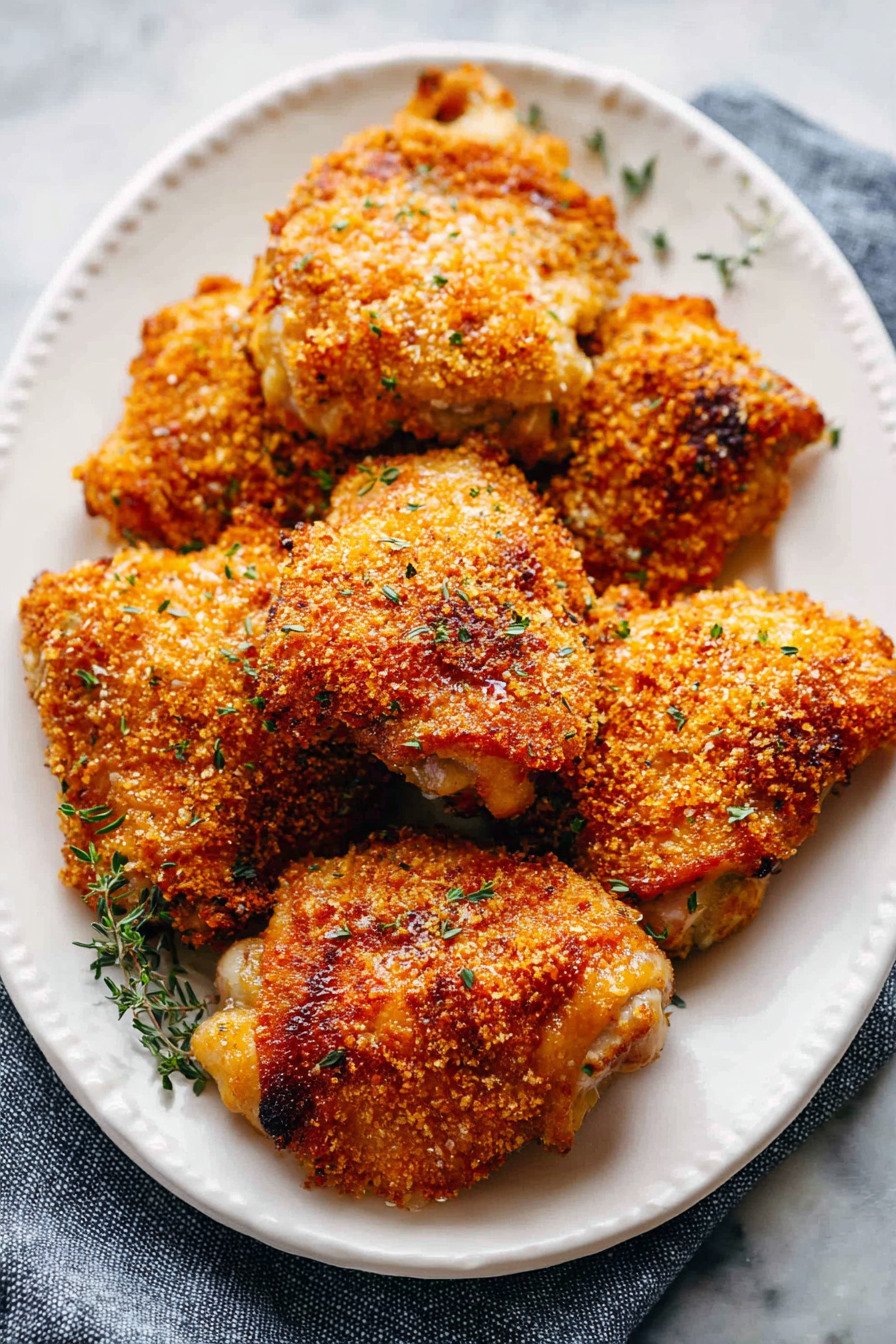
1) What I Learned Testing Crispy Baked Chicken Thighs
Soggy crumbs and dry chicken can make breaded chicken thighs feel disappointing before the first bite. I’m Lila, and my first rushed batch taught me that the breading falls flat when the chicken is too wet or the panko is barely pressed on. After testing the flour layer, egg dip, seasoned crumbs, oil drizzle, and oven timing, I discovered that crispy breaded chicken thighs need structure more than extra ingredients. This method gives me that calm dinner confidence: golden baked breaded chicken thighs with a crisp outside, juicy center, and no skillet of hot oil.
Table of Contents
- 1) What I Learned Testing Crispy Baked Chicken Thighs
- 2) Key Takeaways
- 3) Easy Crispy Baked Chicken Thighs Recipe
- 4) Why Most Crispy Baked Chicken Thighs Recipes Fail
- 5) Ingredients for Crispy Baked Chicken Thighs Recipe
- 6) How to Make Crispy Baked Chicken Thighs Recipe
- 7) Recipe Card: Crispy Baked Chicken Thighs Recipe
- 8) Tips for Making Crispy Baked Chicken Thighs Recipe
- 9) Common Mistakes & Fixes
- 10) How to Tell Crispy Baked Chicken Thighs Are Done
- 11) Professional Secrets Behind Better Crispy Baked Chicken Thighs Recipe
- 12) Best Dishes or Pairings to Serve With Crispy Baked Chicken Thighs Recipe
- 13) Making Crispy Baked Chicken Thighs Recipe Ahead of Time
- 14) Storing Leftover Crispy Baked Chicken Thighs Recipe
- 15) FAQ (Real Cooking Questions)
- 16) Save This Crispy Baked Chicken Thighs Recipe
- 17) Conclusion
- 18) Nutrition
2) Key Takeaways
- Patting the chicken dry before breading helps the flour stick instead of turning gummy.
- Panko gives breadcrumb chicken thighs a lighter crunch than fine crumbs, but it needs firm pressure to stay attached.
- A light olive oil drizzle helps the coating brown in the oven without changing the recipe into fried chicken.
- The chicken is ready when the coating is golden and the thickest part reaches 165°F.
3) Easy Crispy Baked Chicken Thighs Recipe
This breaded chicken thighs recipe works because each layer has a job. The flour dries the surface and gives the egg something to grip. The egg mixture acts like glue. The seasoned panko creates the crisp, craggy coating that makes the chicken look and taste satisfying straight from the oven.
The important detail is not just the ingredient list; it is the order. Flour first, egg second, panko last. When that sequence is rushed, the coating can slide off or bake into soft patches. When it is done carefully, the thighs come out with a golden crust and juicy interior.
4) Why Most Crispy Baked Chicken Thighs Recipes Fail
Most crispy breaded chicken thighs fail because the chicken surface is too wet. Moisture mixes with flour and creates paste instead of a clean dry coating. Patting the thighs dry first gives the flour a better surface to cling to.
Another common problem is loose breading. Panko crumbs are bigger than fine breadcrumbs, so they need to be pressed onto the chicken instead of lightly sprinkled. If the crumbs are barely attached, they fall off on the pan or bake unevenly.
Pale coating usually comes from too little oil or crowded spacing. The olive oil helps the panko toast, while space between the thighs prevents trapped steam from softening the crust. Dry chicken happens when the thighs are baked past 165°F for too long, so the internal temperature matters as much as the color.
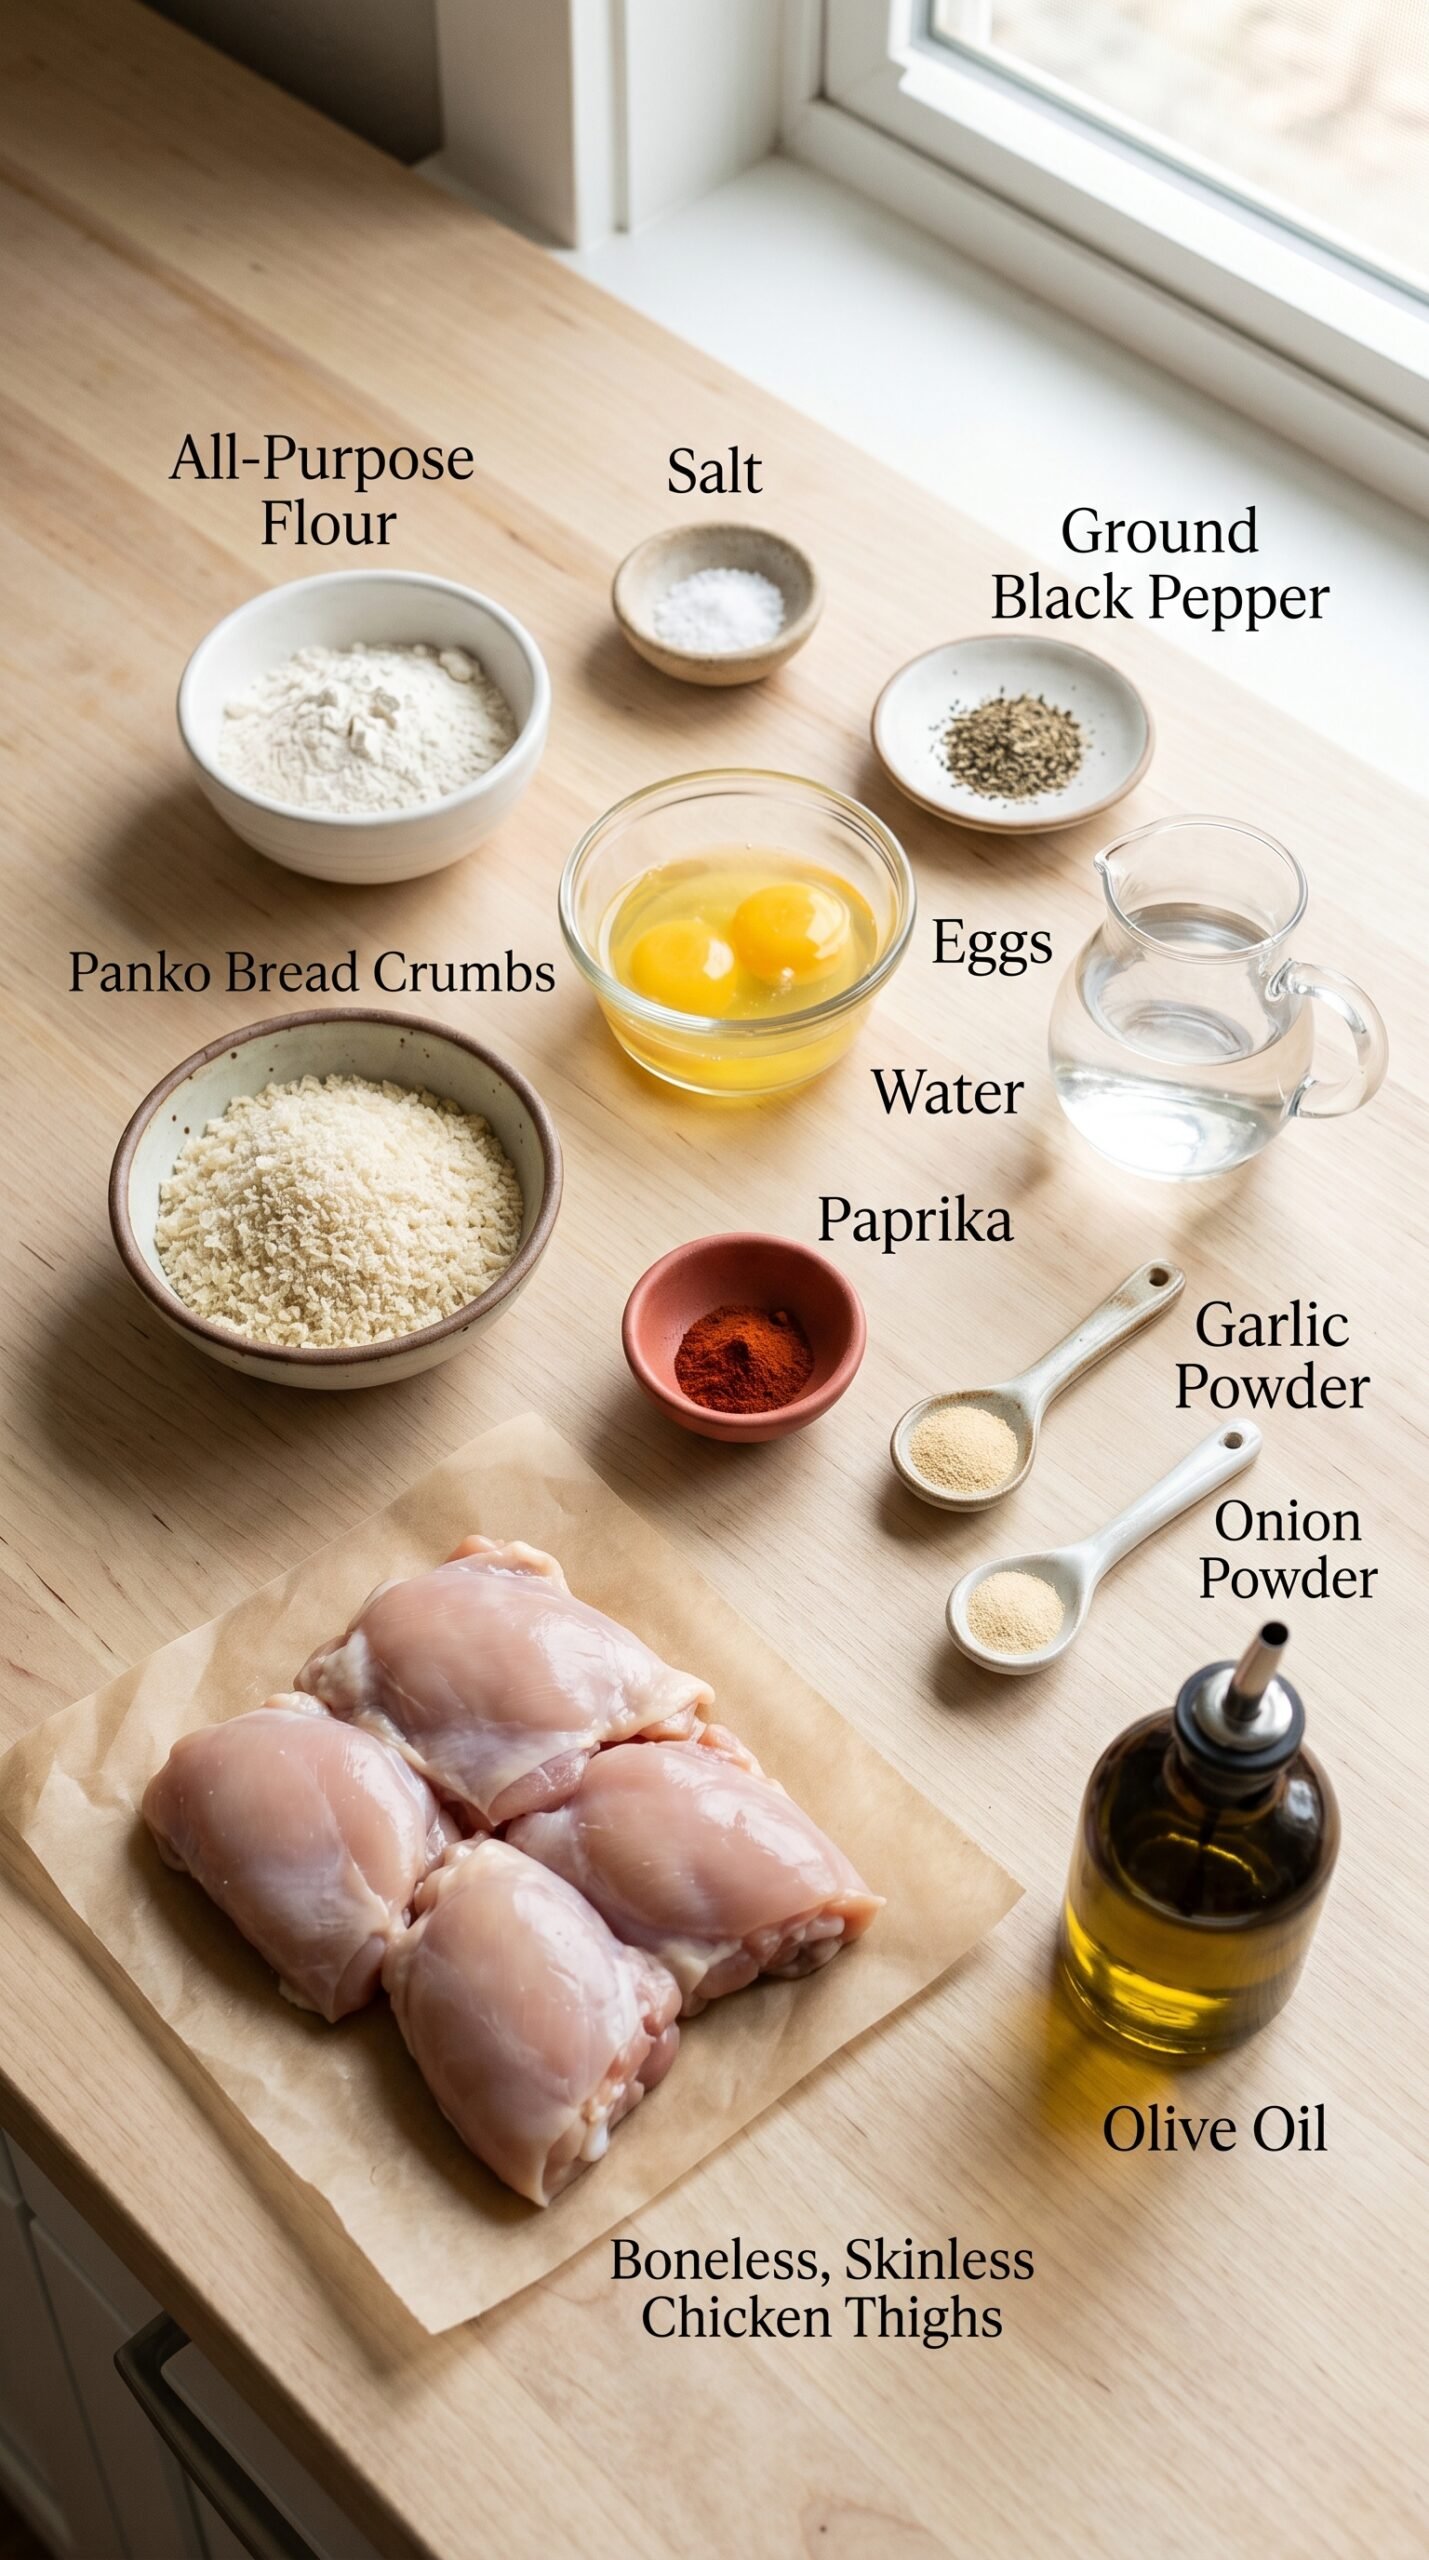
5) Ingredients for Crispy Baked Chicken Thighs Recipe
All-purpose flour: Flour is the first grip layer. Use it before the egg dip so the surface becomes dry enough to hold the coating. Skipping it can make the egg slide off the chicken.
Salt: The divided salt seasons both the flour and the panko. This matters because breaded chicken can taste bland if only the outside crumbs are seasoned.
Ground black pepper: Pepper gives the flour layer mild warmth. Add it early so the flavor sits close to the chicken, not only on the outer crust.
Eggs: Eggs bind the dry flour layer to the panko. Beat them smoothly so the coating goes on evenly without thick egg patches.
Water: Water loosens the eggs slightly, making the dip easier to coat with. Without it, the egg layer can become too thick and make the breading heavy.
Panko bread crumbs: Panko is the main texture ingredient. It creates crisp baked breaded chicken thighs because the flakes are airy and toast well in oven heat.
Paprika: Paprika adds warm color and gentle flavor to the crust. It helps the finished chicken look more golden instead of pale.
Garlic powder: Garlic powder seasons the crumb layer evenly. It is better here than fresh garlic because fresh garlic can burn on the outside before the chicken is cooked.
Onion powder: Onion powder adds savory depth to the panko coating. It rounds out the flavor without adding moisture.
Boneless, skinless chicken thighs: Thighs stay juicier than chicken breast and handle oven heat well. Use pieces that are similar in thickness so they finish at the same time.
Olive oil: Olive oil helps the panko brown and crisp. Add it after the chicken is on the pan so the coating stays in place.
- Panko vs fine breadcrumbs: Panko gives a lighter, crunchier crust, while fine breadcrumbs create a denser coating.
- Chicken thighs vs chicken breast: Thighs are more forgiving because they stay moist while the coating turns golden.
- Oven baking vs pan frying: Baking gives a cleaner method with less oil, but spacing and oil drizzle are essential for crispness.
- Pressed crumbs vs loose crumbs: Pressing the panko onto the chicken helps the coating stay attached through baking.
6) How to Make Crispy Baked Chicken Thighs Recipe
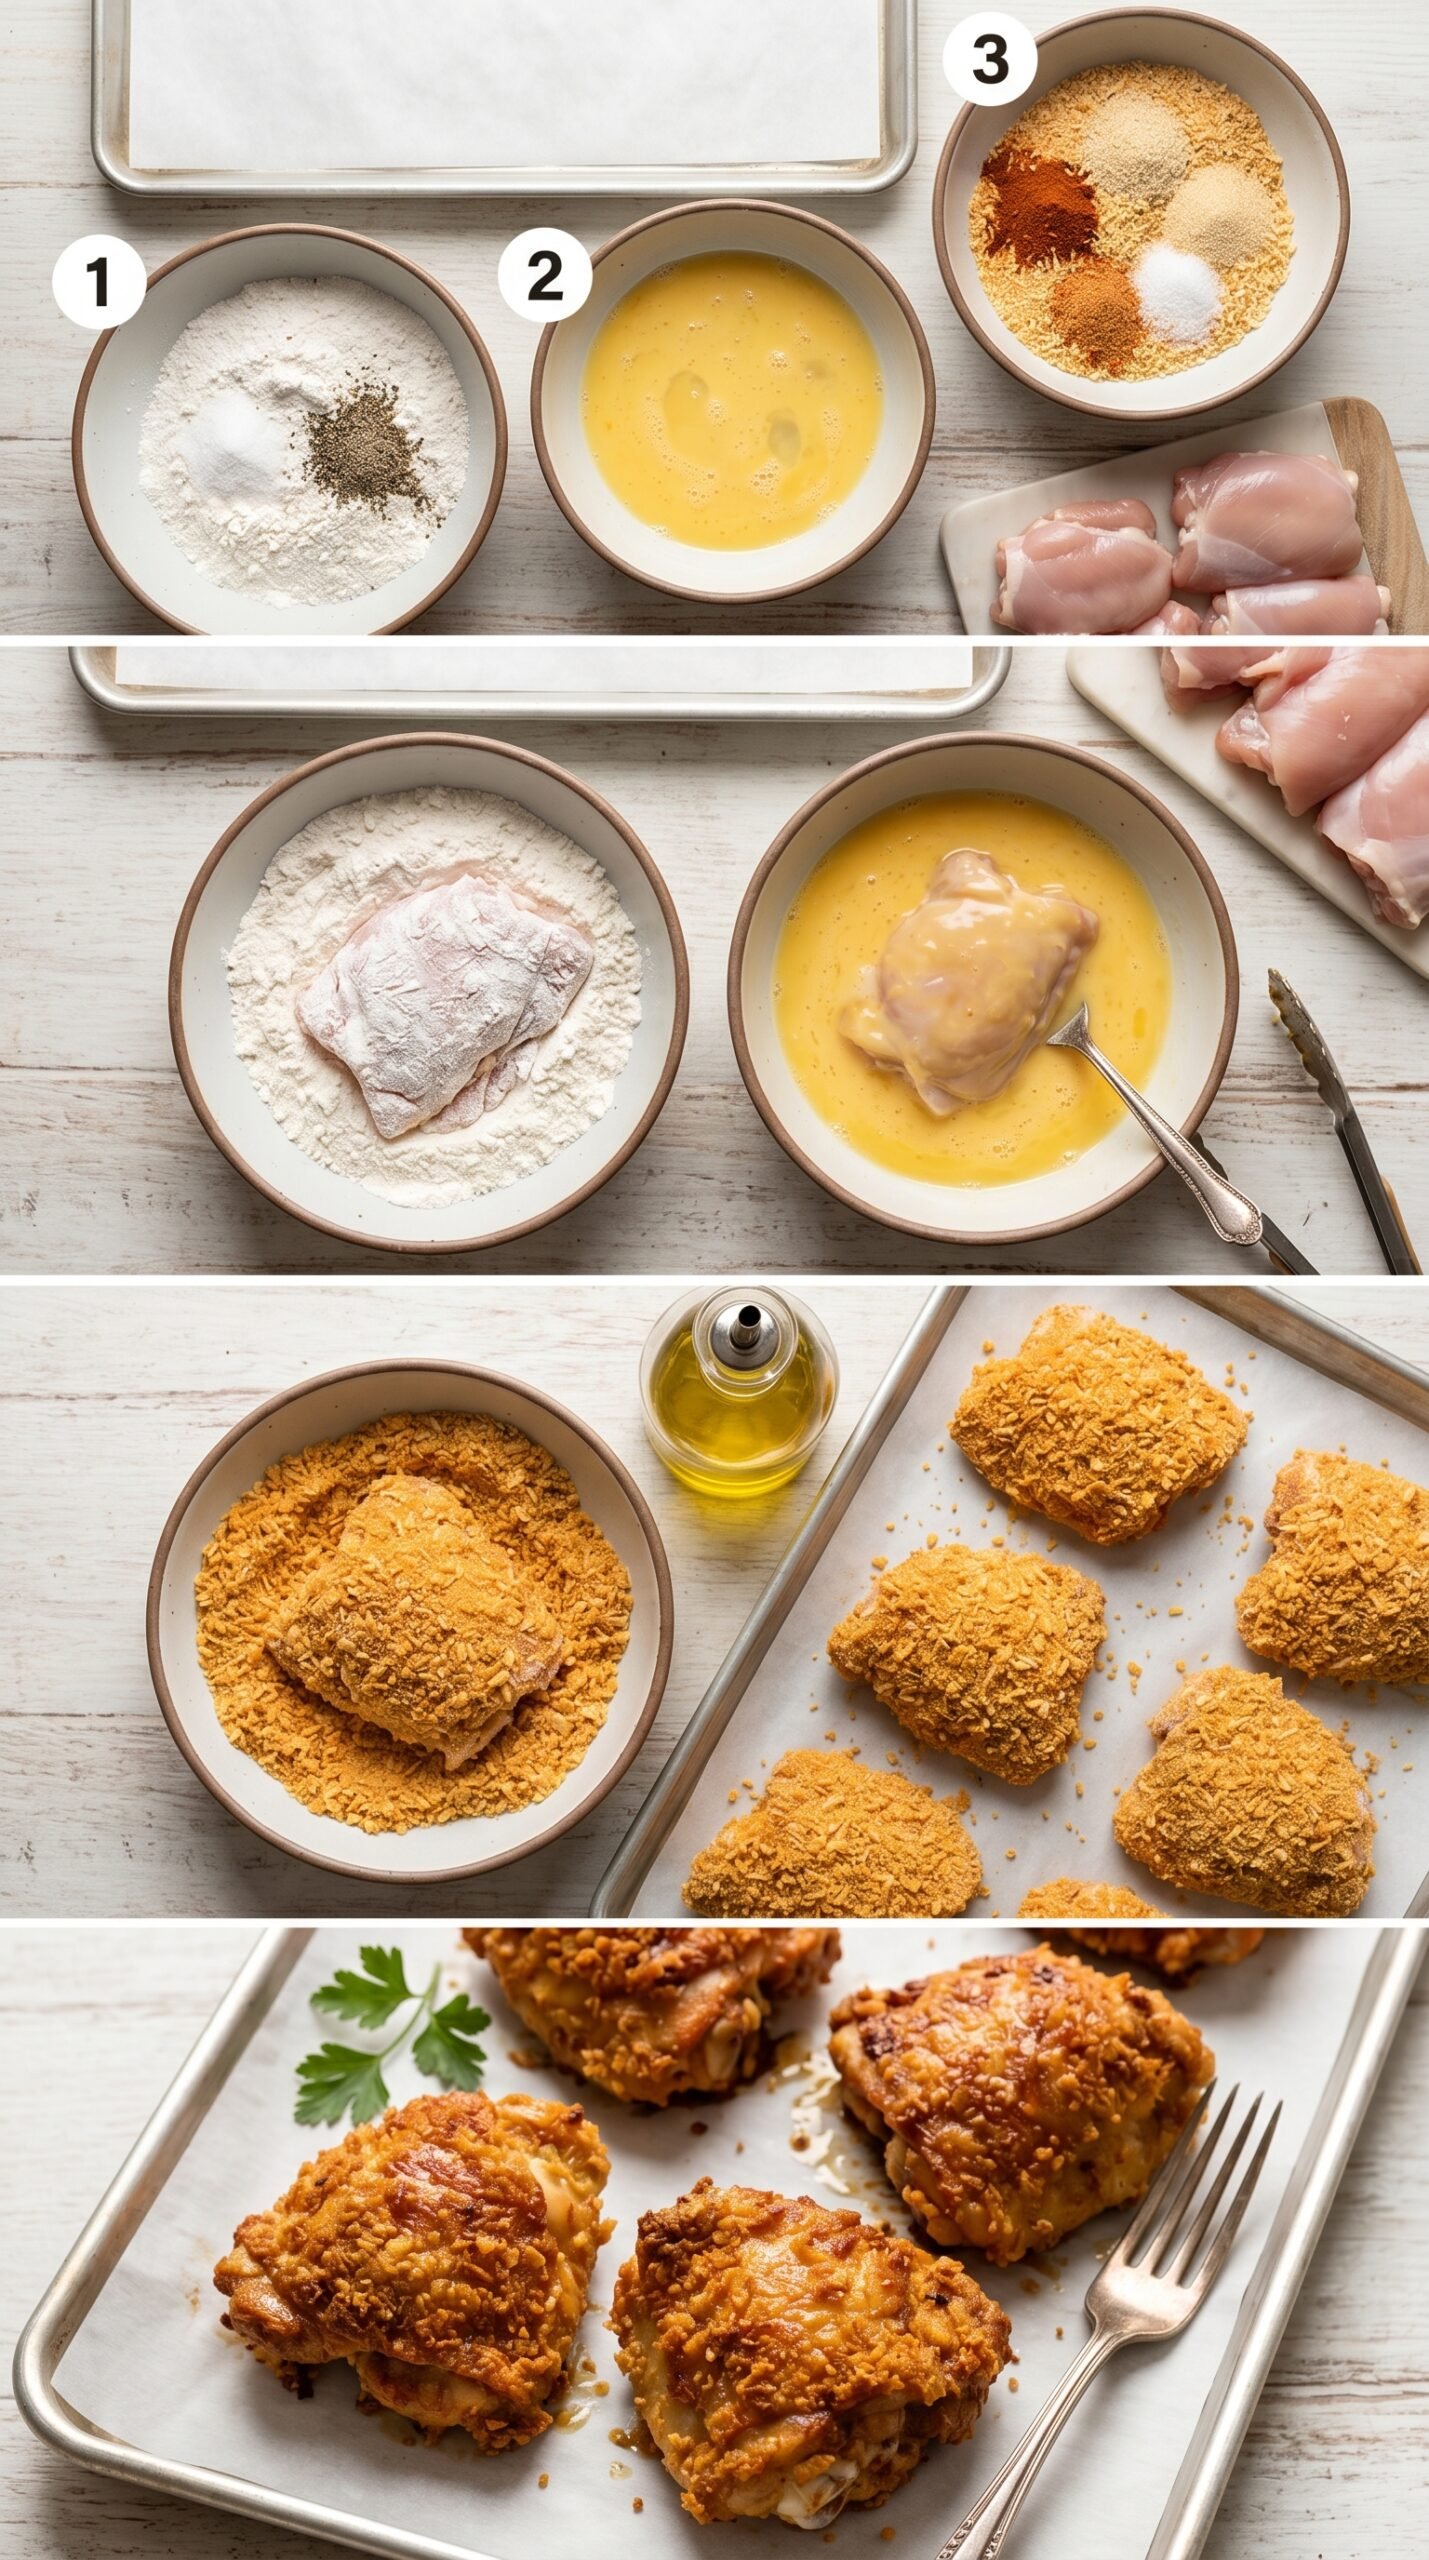
Step 1: Preheat the oven to 400°F and line a baking sheet with parchment paper. A hot oven helps the panko begin crisping quickly instead of sitting in moisture.
Step 2: Set up three bowls: flour with part of the salt and pepper, eggs beaten with water, and panko mixed with the remaining salt, paprika, garlic powder, and onion powder. Keep the bowls in order so the coating builds cleanly.
Step 3: Dredge each chicken thigh in the flour mixture first. Coat it fully, then shake off the extra so the breading does not become thick or dusty.
Step 4: Dip the floured chicken into the egg mixture, then press it into the seasoned panko. Use light pressure with your fingers so the crumbs cling to the curves and edges of each thigh.
Step 5: Place the chicken on the prepared pan, drizzle with olive oil, and bake for 20 to 25 minutes. The chicken should be golden and crisp outside, and the thickest part should reach 165°F before serving.
7) Recipe Card: Crispy Baked Chicken Thighs Recipe
Crispy Baked Chicken Thighs Recipe with Golden Panko Coating
Ingredients
- 1 cup all-purpose flour, used as the dry base so the egg coating can cling evenly
- 1½ tsp salt divided, to season both the flour layer and the seasoned panko coating
- ¼ tsp ground black pepper, added to the flour for gentle background heat
- 2 large eggs, beaten to help the breadcrumb coating stick to the chicken
- 2 tbsp water, whisked with the eggs to loosen the coating for smoother dipping
- 2 cups Panko bread crumbs, the key crumb for a lighter, crispier baked coating
- 1 tsp paprika, added for warm color and mild savory flavor
- ½ tsp garlic powder, used to season the breadcrumb layer evenly
- ½ tsp onion powder, added for deeper savory flavor in the crust
- 2-2½ lbs boneless, skinless chicken thighs, trimmed if needed and patted dry for better breading
- 2 tbsp olive oil, drizzled over the breaded thighs to help the panko turn golden in the oven
Instructions
- Preheat the oven to 400°F. Line a baking sheet with parchment paper so the coating releases cleanly, then set it aside while you prepare the breading station.
- Set out 3 separate bowls. In the first bowl, combine the flour, ½ teaspoon salt, and black pepper. In the second bowl, beat the eggs with the water until smooth. In the third bowl, combine the Panko bread crumbs, remaining salt, paprika, garlic powder, and onion powder, making sure the seasoning is evenly distributed.
- Pat the chicken thighs dry if they feel wet. Dredge each thigh in the flour mixture until fully coated, shake off excess flour, dip into the egg mixture, then press into the seasoned bread crumbs so the panko adheres to all sides.
- Place the breaded chicken thighs on the prepared baking sheet with a little space between each piece. Drizzle the olive oil evenly over the tops so the coating can crisp instead of drying out.
- Bake for 20-25 minutes, or until the outside is crisp and golden brown and the thickest part of each chicken thigh reaches 165°F. Let the chicken rest for a few minutes before serving so the juices settle and the coating stays crisp.
8) Tips for Making Crispy Baked Chicken Thighs Recipe
Use one hand for dry coating and one hand for wet coating if you want cleaner breading. This prevents flour, egg, and panko from clumping on your fingers and keeps the crumb mixture usable for every piece.
Do not skip the parchment paper. It helps the crust release from the pan and reduces the chance of tearing the bottom coating when you lift the chicken.
For easy baked chicken thighs with better browning, leave space between each piece. If the thighs touch, they steam at the edges and the panko softens. A crowded pan is one of the fastest ways to lose crunch.
If some thighs are thicker than others, place the thickest pieces toward the outer area of the baking sheet where heat often feels stronger. Check temperature with an instant-read thermometer instead of cutting into every piece and losing juices.
9) Common Mistakes & Fixes
Problem: The coating falls off. Cause: The chicken was too wet, the flour was too thick, or the panko was not pressed on. Fix: Pat the thighs dry, shake off extra flour, and press the crumbs firmly onto each piece.
Problem: The crust turns soggy. Cause: The pan was crowded or the chicken released steam underneath the coating. Fix: Space the thighs apart and avoid covering them right after baking.
Problem: The chicken is dry. Cause: It baked too long after reaching a safe internal temperature. Fix: Start checking near 20 minutes and remove the chicken when the thickest part reaches 165°F.
Problem: The flavor tastes flat. Cause: Only the outer crumbs were seasoned, or the salt was not divided properly. Fix: Season the flour layer and the panko layer so every bite has flavor.
10) How to Tell Crispy Baked Chicken Thighs Are Done
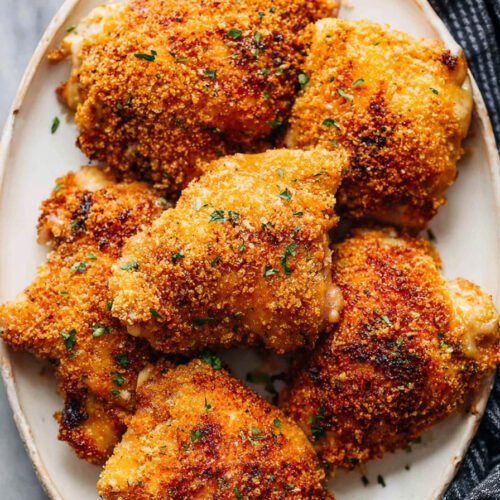
Crispy baked chicken thighs are done when the coating is golden brown, the panko looks dry and crisp instead of pale or damp, and the chicken feels firm but not hard. The most reliable sign is temperature: the thickest part of each thigh should reach 165°F.
The aroma should be savory, warm, and lightly toasted from the paprika, garlic powder, onion powder, and panko. If the coating smells floury or looks beige, it may need a few more minutes. If the juices run out onto the pan and the crust looks dark, the chicken may be overcooking.
11) Professional Secrets Behind Better Crispy Baked Chicken Thighs Recipe
The first professional habit is controlling moisture. Breaded chicken needs a dry surface before coating, because water weakens the bond between flour, egg, and crumbs. Even a quick pat with paper towels can change the final crust.
The second secret is seasoning in layers. A good breaded chicken thighs recipe should not rely only on the outside crumbs for flavor. Seasoning the flour and the panko keeps the chicken from tasting plain once you bite past the crust.
The third secret is letting oven heat circulate. Space, parchment, and a light oil drizzle work together. The oil helps the panko toast, the parchment protects the coating, and the spacing keeps steam from turning the crust soft.
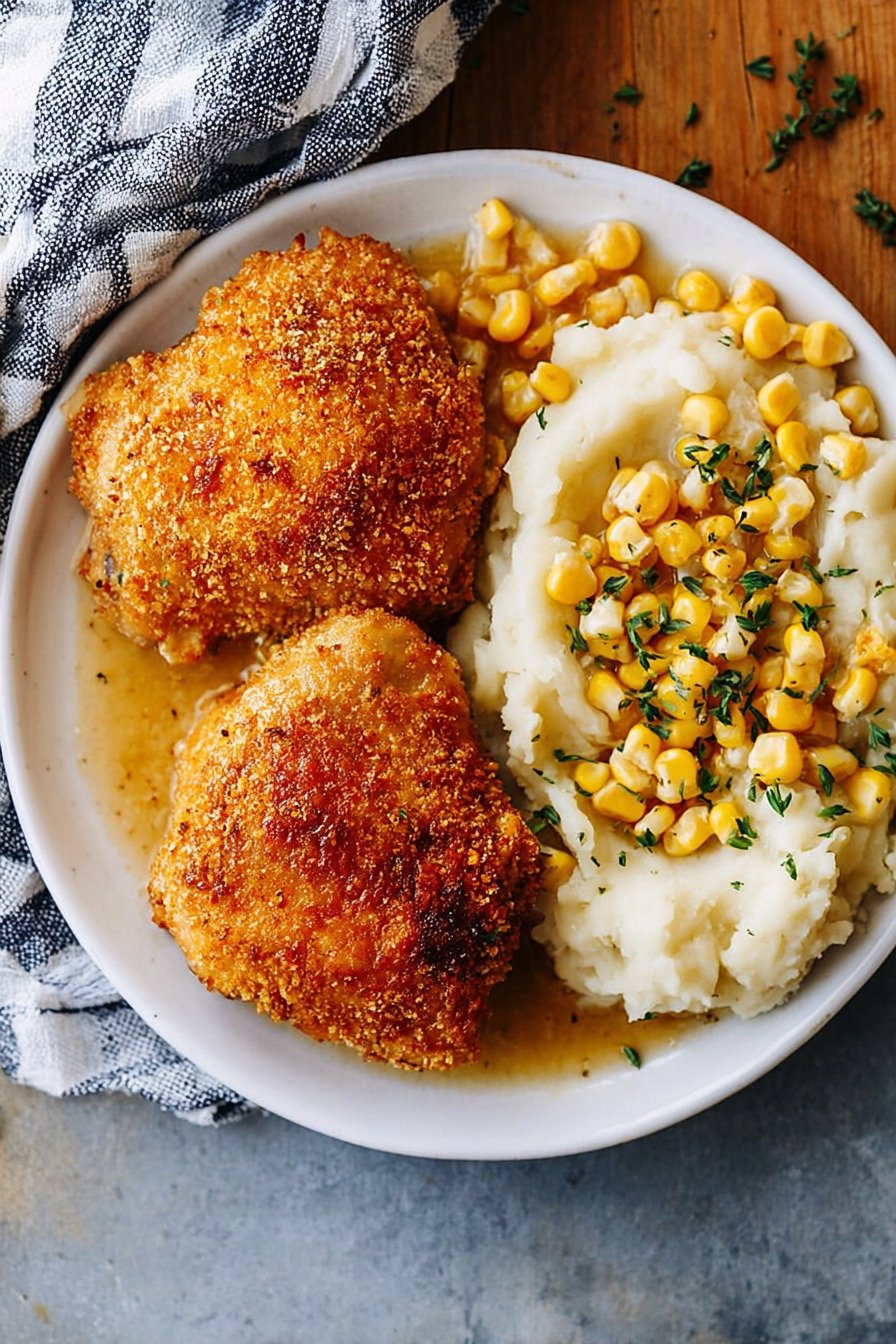
12) Best Dishes or Pairings to Serve With Crispy Baked Chicken Thighs Recipe
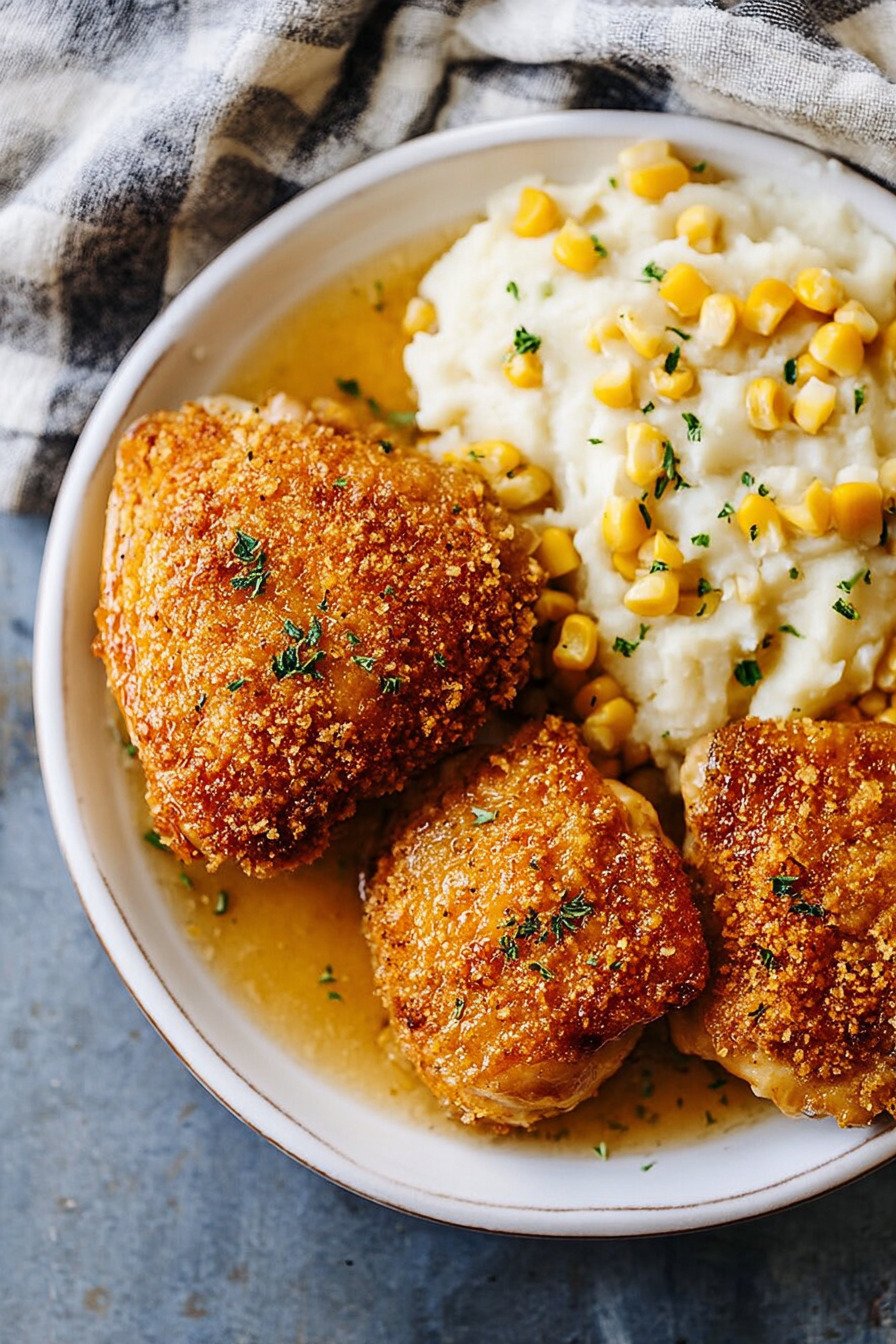
Serve breaded chicken thighs with sides that balance the crisp coating. A bright green salad, roasted broccoli, cucumber slaw, or lemony vegetables can cut through the richness. For a comfort-food plate, pair them with mashed potatoes, buttered rice, macaroni and cheese, or roasted sweet potatoes.
For sauces, choose something that adds moisture without soaking the coating. Honey mustard, ranch, garlic yogurt sauce, spicy mayo, or a squeeze of lemon all work well. Add sauce on the side instead of pouring it over the chicken if you want to keep the panko crisp.


13) Making Crispy Baked Chicken Thighs Recipe Ahead of Time
You can bread the chicken a few hours ahead and keep it refrigerated until baking. Place the coated thighs on a lined tray and cover them lightly so the crumbs do not get smashed. Drizzle the olive oil right before baking, not before refrigeration, so the panko does not absorb too much moisture.
If making chicken thigh recipes breaded for a busy dinner, prepare the breading station earlier in the day and keep the dry mixtures covered separately. Bread the chicken closer to baking time for the best texture.
14) Storing Leftover Crispy Baked Chicken Thighs Recipe
Store leftover baked breaded chicken thighs in an airtight container in the refrigerator for up to 3 days. The coating will soften as it sits because refrigeration adds moisture to the crust, but it can still reheat well with the right method.
For the best leftover texture, reheat the chicken on a rack or parchment-lined baking sheet in a 375°F oven until hot. Avoid microwaving if crispness matters, because steam softens the panko. Leftovers can be sliced over salad, tucked into wraps, or served with roasted vegetables for another meal.
15) FAQ (Real Cooking Questions)
Can I use regular breadcrumbs instead of panko? Yes, but the texture will be different. Regular breadcrumbs make a finer, denser crust, while panko creates lighter crispy breaded chicken thighs with more crunch.
Why did my breading fall off? The most common reasons are wet chicken, too much loose flour, or not pressing the crumbs on firmly. Dry the chicken first and press the panko into the surface before baking.
Can I use bone-in chicken thighs? This method is written for boneless, skinless chicken thighs. Bone-in thighs need a longer bake time, and the coating may brown before the meat finishes cooking.
How do I keep the coating crispy after baking? Let the chicken rest uncovered for a few minutes. Covering it tightly traps steam, which softens the crust.
Can I make these breaded chicken thighs healthier? You can keep the same method and use a lighter hand with the olive oil, but do not skip it completely if you want browning. The oil helps the panko toast in the oven.
16) Save This Crispy Baked Chicken Thighs Recipe
If this crispy baked chicken thighs recipe helped you solve soggy coating or dry chicken, save it for a weeknight dinner when you want crunch without frying. The key reminder is: dry the chicken, press on the panko, and bake only until the thighs reach 165°F.

17) Conclusion
Once you understand the coating layers, breaded chicken thighs become much easier to control. The flour gives grip, the egg holds the crumbs, the seasoned panko brings crunch, and the olive oil helps everything brown in the oven. Instead of guessing why the crust turned soft or the chicken dried out, you can now read the signs: dry surface, firm crumb pressure, open pan spacing, golden color, and 165°F doneness. That is the difference between ordinary baked chicken and a crisp, juicy dinner that feels reliable every time.
18) Nutrition
Serving Size 1 portion Calories 430 Sugar 1 g Sodium 850 mg Fat 18 g Saturated Fat 4 g Carbohydrates 31 g Fiber 2 g Protein 34 g Cholesterol 165 mg


Leave a Comment